> For clean Markdown of any page, append .md to the page URL.
> For a complete documentation index, see https://next.developer.frame.io/camera-to-cloud/implementing-c2c-authentication-and-authorization/llms.txt.
> For AI client integration (Claude Code, Cursor, etc.), connect to the MCP server at https://next.developer.frame.io/_mcp/server.
# How to: Authorize
## Introduction
This guide demonstrates the authentication and authorization process for Camera to Cloud (C2C) devices on a Frame.io project. We'll explore both the standard manual code entry method and the enhanced QR code pairing approach for optimal user experience.
## What Will I Need?
Please review the [Before We Start Implementing](./implementing-c2c-setting-up) guide if you haven't already.
You should have received a `client_secret` from our team to identify your integration. If not, please consult [this introduction](./getting-started-with-cloud-device-integrations) to the C2C ecosystem and contact our team.
### Prerequisites for URL & QR Code Pairing
To implement URL & QR code pairing, ensure you meet these requirements:
* **Device Compatibility**: Verify your device supports URL/QR code generation during the pairing process.
## Walking Through the Auth Flow
To understand the authorization flow from a user perspective, please reference these resources:
* [Support Article](https://help.frame.io/en/collections/8960335-frame-io-c2c) for adding new devices.
* [Training video](https://help.frame.io/en/articles/5091124-camera-to-cloud-training-series) on authorizing a Teradek Cube.
This authorization process minimizes implementation requirements. You won't need to:
* Redirect to web browsers (unless using URL Code Pairing)
* Handle Frame.io user authentication
* Present account/project selection interfaces
* Develop complex UI components beyond basic information displays
### Enhancing the User Experience with URL Code Pairing
Modern users expect efficient device interactions. While the current manual pairing process functions adequately, it can be optimized.
By implementing URL & QR code pairing—similar to streaming services like Netflix or Disney+—we can significantly streamline the process, minimize input errors, and reduce pairing time.
## Device Identification (client_id)
Each physical device requires a unique identifier for connection tracking within a user's project.
For devices, this identifier is the `client_id`, which is essential during authorization. When implementing, consider appropriate identifier sources such as device serial numbers, UUIDs, or other unique strings. If you are integrating on an Apple device, we recommend using a unique persistent UUID that is consistent across device reboots.
Exercise caution regarding personally identifiable information. User email addresses are not appropriate `client_id` values.
Additionally, ensure you control the identifier. Device MAC addresses are unsuitable as they aren't owned by your software and may constitute personally identifiable information.
If you need guidance on selecting an appropriate identifier, our team can assist in determining a suitable value that simplifies integration.
## Step 1: Requesting a Device Code
To begin implementation, request a device code through the `/v2/auth/device/code` endpoint:
### Traditional Pairing Method
```
curl -X POST https://api.frame.io/v2/auth/device/code \
--form 'client_id=[client_id]' \
--form 'client_secret=[client_secret]' \
--form 'scope=asset_create offline' \
| python -m json.tool
```
### Enabling URL Code Pairing
For URL code pairing, modify the API call with additional headers:
```
curl -X POST https://api.frame.io/v2/auth/device/code \
--header "x-client-version: 2.0.0" \
--header "x-client-platypus-enabled: true" \ # New header to enable URL pairing
--form 'client_id=[client_id]' \
--form 'client_secret=[client_secret]' \
--form 'scope=asset_create offline' \
| python -m json.tool
```
**Note:** These authentication endpoints accept form data exclusively, not JSON. Post-authentication, other endpoints will accept JSON payloads, but authentication endpoints will reject JSON requests.
#### Payload Parameters
* **client_id**: The unique identifier for your physical device. This must be guaranteed unique, such as a serial number or UUID.
* **client_secret**: Provided by Frame.io support to identify your device model. This confidential value should remain protected from users and encrypted when stored.
* **scope**: The requested permissions, separated by spaces. Devices may request:
* `asset_create`: Enables asset creation and uploading.
* `offline`: Permits authorization refreshing via refresh token. Without this scope, users would need to re-authorize their device every 8 hours as authorization tokens expire.
In practical implementations, devices typically request both scopes.
### Understanding the API Response
The request generates a response similar to:
#### Traditional Pairing Response
```
{
"device_code": "[device_code]",
"expires_in": 120,
"interval": 5,
"name": "MyDevice-[client_id]",
"user_code": "573131"
}
```
#### URL Pairing Response
```
{
"device_code": "[device_code]",
"expires_in": 120,
"interval": 5,
"name": "MyDevice-[client_id]",
"user_code": "573131",
"verification_uri": "https://next.frame.io/pair",
"verification_uri_complete": "https://next.frame.io/pair/573131"
}
```
#### Response Breakdown
* **device_code**: This internal identifier should remain hidden from users and identifies the authorization request during polling.
* **expires_in**: The code's validity period in seconds.
* **interval**: The recommended polling interval in seconds.
* **name**: The connecting device's identifier.
* **user_code**: The six-digit code for manual entry into Frame.io for device pairing.
* **verification_uri**: The base URL for manual entry if QR scanning is unavailable.
* **verification_uri_complete**: The full URL containing the pairing code, intended for hyperlinking within a mobile app or QR code generation to streamline user navigation to the pairing interface.
### Displaying the QR Code to the User
Using the `verification_uri_complete`, generate and display a QR code on the device screen for the user to scan, facilitating efficient pairing.
#### Example: Device Screen with QR Code Displayed
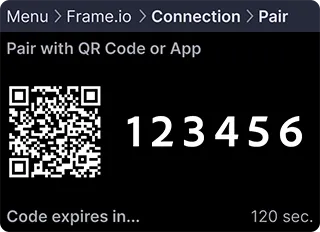
Always provide fallback options: display the `user_code` and `verification_uri` for manual entry when QR scanning isn't possible. Alternatively, consider displaying the `verification_uri` as a static QR code for mobile scanning.
For mobile app integrations, include the `verification_uri_complete` as a tappable hyperlink since users cannot scan QR codes from the device running the app.
## Step 2: Polling for User Authorization
After providing the pairing code or URL code, verify user entry with this request:
```
curl -X POST https://api.frame.io/v2/auth/token \
--form 'client_id=[client_id]' \
--form 'device_code=[device_code]' \
--form 'grant_type=urn:ietf:params:oauth:grant-type:device_code' \
| python -m json.tool
```
### Payload Parameters
* **client_id**: The same identifier used in Step 1.
* **device_code**: The `device_code` value returned previously.
* **grant_type**: The OAuth grant type identifier, consistently `urn:ietf:params:oauth:grant-type:device_code` for this implementation.
Initial polling attempts typically return:
```
{
"error": "authorization_pending"
}
```
This non-fatal error indicates the user hasn't completed code entry. Continue polling until completion.
> **Note for iOS app devices:** If the user switches to the Frame.io iOS app to enter the pairing code, your app may move to the background. When your app becomes active again, such as in `applicationDidBecomeActive`, resume polling so the authorization flow can continue without requiring the user to restart pairing.
If you receive:
```
{
"error": "expired_token"
}
```
The code expired before user entry. Generate a new code/QR code via Step 1, present it to the user, and resume polling.
Successful authorization produces:
```
{
"access_token": "[access_token]",
"expires_in": 28800,
"refresh_token": "[refresh_token]",
"token_type": "bearer"
}
```
Congratulations on successfully authorizing your Camera to Cloud device!
Let's examine this response:
* **access_token**: Your authentication credential for Frame.io backend access, required in headers for future API requests.
* **expires_in**: The access token validity period in seconds, after which refreshing is necessary.
* **refresh_token**: Used for access token management, primarily for refreshing authorization but also applicable for revocation.
* **token_type**: Consistently `bearer` for C2C API implementations, requiring no action.
## Putting the Steps Together
Now let's implement these API calls in Python-like pseudocode, handling potential device code expiration:
**`Python`**
```python title="Python"
def authorize_with_frame():
"""
Handles authorizing our device with Frame.io.
"""
# Our client ID can be a serial number, UUID, or some other unique string.
client_id = THIS_DEVICE.get_serial_number()
while True:
# Make the call to Frame.io to get our device codes.
pairing_codes = c2c.get_device_codes(client_id)
# We need to keep track of how long we have been polling for
polling_started = datetime.now()
# Now we are going to poll for authorization until the user enters the code.
while True:
# Re-write this output each time we poll. Note: This message will only update once
# per `interval` (e.g., 5 seconds), so if a smooth countdown is desired, that will
# need a different implementation.
print(
f"\rPAIRING CODE: {pairing_codes.user_code}, "
f"EXPIRES IN: {pairing_codes.expires_in - (datetime.now() - polling_started).seconds} seconds"
)
# Wait for `interval` before polling each time.
sleep(pairing_codes.interval)
# Make a call to Frame.io to see if the user has entered the code and authorized
# the device.
authorization, error = c2c.poll_for_authorization(
client_id, pairing_codes.device_code
)
if error and error.message == "authorization_pending":
# If the authorization is pending, try again.
continue
elif error and error.message == "expired_token":
# If the pairing codes have expired, break to generate new codes.
break
elif error:
# If there was some other error, raise it.
raise error
else:
# If there was no error, we have our authorization!
return authorization
# If we get here, our pairing codes expired. Let's try again.
print("\nPairing code expired. Generating a new one...")
```
**Note:** The outer loop handles cases where pairing codes expire and new codes are required.
As a final step, retrieve and display project information from Frame.io to confirm successful pairing to the intended project. We'll cover this in the next tutorial.
## Creating and Displaying QR Codes for Pairing
When implementing URL/QR code pairing, you'll need to generate a QR code from the `verification_uri_complete` value in the response. Here are examples using popular libraries in different programming languages:
### Python Example using qrcode
**`Python`**
```python title="Python"
import qrcode
from PIL import Image
import io
def generate_qr_code(verification_uri_complete, size=250):
"""
Generate a QR code from the verification_uri_complete URL.
Args:
verification_uri_complete (str): The complete verification URI returned by Frame.io
size (int, optional): Size of the QR code in pixels. Defaults to 250.
Returns:
PIL.Image: QR code image that can be displayed or saved
"""
qr = qrcode.QRCode(
version=1,
error_correction=qrcode.constants.ERROR_CORRECT_L,
box_size=10,
border=4,
)
qr.add_data(verification_uri_complete)
qr.make(fit=True)
img = qr.make_image(fill_color="black", back_color="white")
# Resize the image if needed
img = img.resize((size, size))
return img
# Example usage in authorization flow
def display_qr_for_pairing(pairing_codes):
"""
Generate and display QR code along with manual pairing instructions.
"""
if hasattr(pairing_codes, 'verification_uri_complete'):
# Generate QR code from the verification URI
qr_img = generate_qr_code(pairing_codes.verification_uri_complete)
# Display the QR code on screen
# For GUI applications like Tkinter, PyQt, etc.
# display_image(qr_img)
# For headless devices or testing, save to file
qr_img.save("frame_io_pairing_qr.png")
print(f"Scan the QR code or visit: {pairing_codes.verification_uri}")
print(f"Manual code: {pairing_codes.user_code}")
else:
# Fallback for devices that received traditional pairing response
print(f"Enter code on Frame.io: {pairing_codes.user_code}")
```
### JavaScript Example (Web or Electron)
```javascript
import QRCode from 'qrcode';
/**
* Generate and display a QR code from the verification URI
* @param {string} verificationUriComplete - The complete verification URI from Frame.io
* @param {string} elementId - ID of the HTML element to display the QR code in
*/
function displayQRCode(verificationUriComplete, elementId = 'qrcode-container') {
const element = document.getElementById(elementId);
if (!element) {
console.error(`Element with ID ${elementId} not found`);
return;
}
// Clear any existing content
element.innerHTML = '';
// Generate QR code
QRCode.toCanvas(element, verificationUriComplete, { width: 250 }, function(error) {
if (error) {
console.error('Error generating QR code:', error);
// Fallback to displaying the URL as a link
element.innerHTML = `Click here to pair`;
}
});
// Also display manual pairing information
const manualInfoDiv = document.createElement('div');
manualInfoDiv.innerHTML = `
Scan the QR code or click here to pair your device.
Manual code: ${userCode}
`;
element.parentNode.appendChild(manualInfoDiv);
}
// Example usage in authorization flow
async function requestDeviceCode() {
try {
const response = await fetch('https://api.frame.io/v2/auth/device/code', {
method: 'POST',
headers: {
'x-client-version': '2.0.0',
'x-client-platypus-enabled': 'true'
},
body: new URLSearchParams({
'client_id': YOUR_CLIENT_ID,
'client_secret': YOUR_CLIENT_SECRET,
'scope': 'asset_create offline'
})
});
const data = await response.json();
if (data.verification_uri_complete) {
displayQRCode(data.verification_uri_complete);
window.userCode = data.user_code; // Store for display purposes
} else {
// Fallback for traditional pairing
displayManualPairingCode(data.user_code);
}
// Begin polling for authorization
beginPollingForAuthorization(data.device_code, data.interval);
} catch (error) {
console.error('Error requesting device code:', error);
}
}
```
### Android Example (Java)
```java
import android.graphics.Bitmap;
import android.widget.ImageView;
import com.google.zxing.BarcodeFormat;
import com.google.zxing.MultiFormatWriter;
import com.google.zxing.common.BitMatrix;
import com.journeyapps.barcodescanner.BarcodeEncoder;
public void generateAndDisplayQRCode(String verificationUriComplete, ImageView qrCodeImageView) {
try {
MultiFormatWriter multiFormatWriter = new MultiFormatWriter();
BitMatrix bitMatrix = multiFormatWriter.encode(verificationUriComplete,
BarcodeFormat.QR_CODE, 250, 250);
BarcodeEncoder barcodeEncoder = new BarcodeEncoder();
Bitmap bitmap = barcodeEncoder.createBitmap(bitMatrix);
// Display in ImageView
qrCodeImageView.setImageBitmap(bitmap);
} catch (Exception e) {
e.printStackTrace();
// Fallback to displaying the URL as text
}
}
```
### iOS Example (Swift)
```swift
import UIKit
import CoreImage
func generateQRCode(from string: String) -> UIImage? {
let data = string.data(using: String.Encoding.utf8)
if let filter = CIFilter(name: "CIQRCodeGenerator") {
filter.setValue(data, forKey: "inputMessage")
filter.setValue("H", forKey: "inputCorrectionLevel")
if let outputImage = filter.outputImage {
// Scale the image
let transform = CGAffineTransform(scaleX: 10, y: 10)
let scaledImage = outputImage.transformed(by: transform)
// Convert to UIImage
let context = CIContext()
if let cgImage = context.createCGImage(scaledImage, from: scaledImage.extent) {
return UIImage(cgImage: cgImage)
}
}
}
return nil
}
// Usage in your view controller
func displayPairingQRCode(verificationUriComplete: String) {
if let qrCodeImage = generateQRCode(from: verificationUriComplete) {
qrCodeImageView.image = qrCodeImage
// Also show manual pairing information
pairingInstructionsLabel.text = "Scan the QR code or enter code manually"
pairingCodeLabel.text = userCode
} else {
// Fallback to manual code display
pairingInstructionsLabel.text = "Enter this code on Frame.io:"
pairingCodeLabel.text = userCode
}
}
```
## Best Practices for QR Code Display
When implementing QR code pairing, consider these guidelines for the best user experience:
1. **Optimal Size**: Display QR codes at least 200-250 pixels square for reliable scanning.
2. **Contrast**: Ensure high contrast between QR code and background (black on white is ideal).
3. **Error Correction**: Use moderate error correction levels (L or M) to balance code density and reliability.
4. **Clear Instructions**: Provide clear guidance on how to scan the code, such as "Scan this code with your smartphone camera to pair your device."
5. **Multiple Options**: Always provide the manual pairing code alongside the QR code as a fallback:
```
Scan to pair:
[QR CODE]
Or enter code manually: 573131
```
6. **Hyperlink for Mobile Apps**: If your integration is a mobile application, include the `verification_uri_complete` as a tappable link since users cannot scan a QR code from the same device.
7. **Testing**: Test your QR codes with various devices and lighting conditions to ensure reliable scanning.

## Troubleshooting
If you encounter issues, consult these common scenarios and solutions:
* **"Connect Device" Button Not Visible**: When accessing the C2C management panel, this could indicate:
* **Insufficient Permissions**: If you see a permissions message, contact your account manager to adjust permissions or assign an appropriate role.
* **Existing Device Connection**: After connecting one device, the primary "Add New Device" button is replaced by a three-dot menu in the upper-right corner of the C2C Connections panel.
* **Invalid Client Error**: An `invalid_client` response indicates device information mismatch, typically due to an incorrect `client_secret`.
* **Bad Request Error**: A `bad_request` response indicates malformed request data. Verify field names and ensure all required fields are included.
If your issue isn't addressed here, please share your experience so we can enhance this troubleshooting section.
## Next Steps
We encourage you to contact our team and proceed to the [authorization management guide](./how-to-authorization-management). We look forward to your feedback!