
Postman Collection
This guide covers the basics of the official Frame.io Developer API Postman collection, a set of prebuilt requests you can use to get started with the Frame.io V4 API.
The collection covers the full range of V4 API endpoints, split into stable and experimental categories. Stable endpoints are production-ready, and experimental endpoints are newer additions that are functional but may change based on feedback before being promoted to stable.
Getting Started with Postman
This guide assumes you have generated credentials for the API. If you haven’t, start here first
Create a Postman Account + Choose Your Setup
Create your Postman account at postman.com, and choose your setup. You can download the Postman app here or use Postman on the web.
Setting Up Your Environment
The Frame.io Developer API Collection has a default environment with a number of environment variables defined. BASE_URL and IMS_BASE_URL values are static. Additional environment variables can be configured according to your account information.
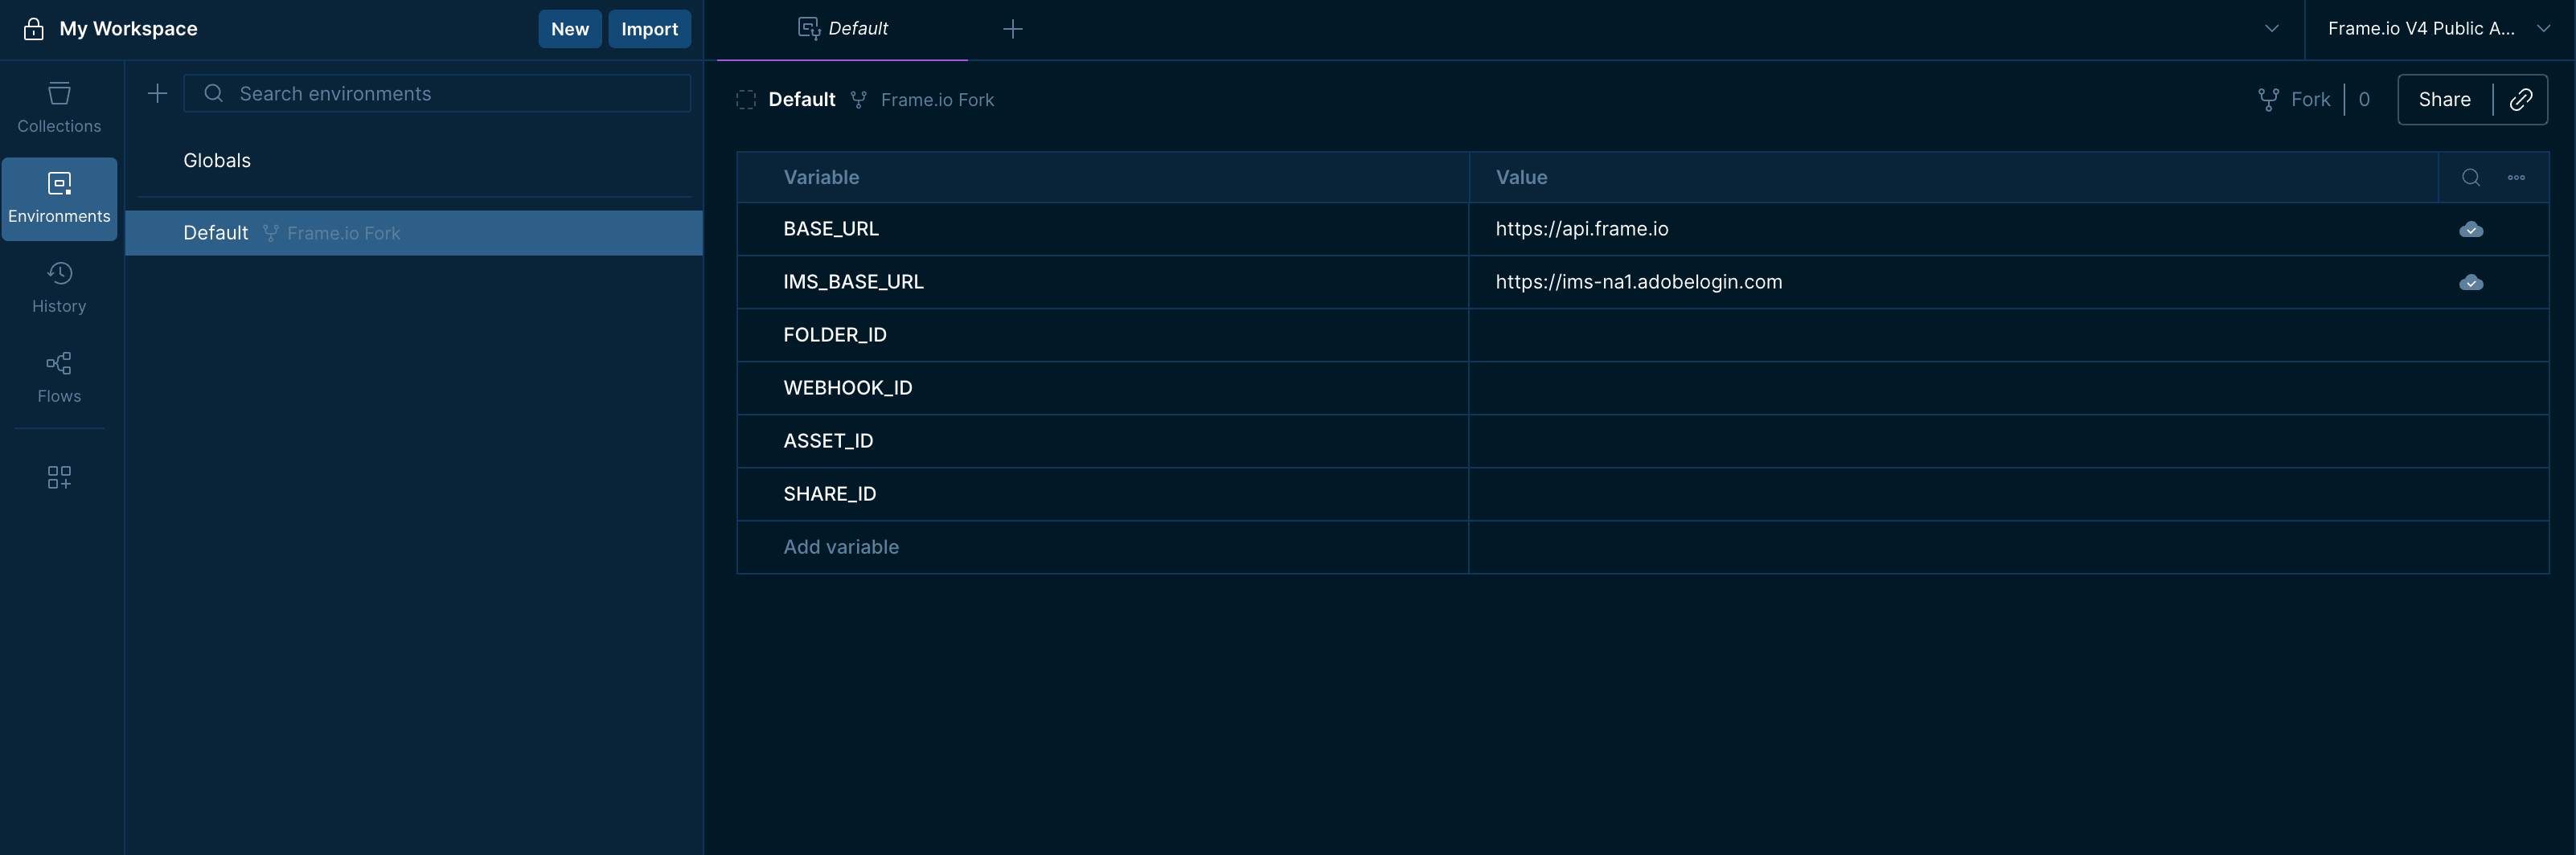
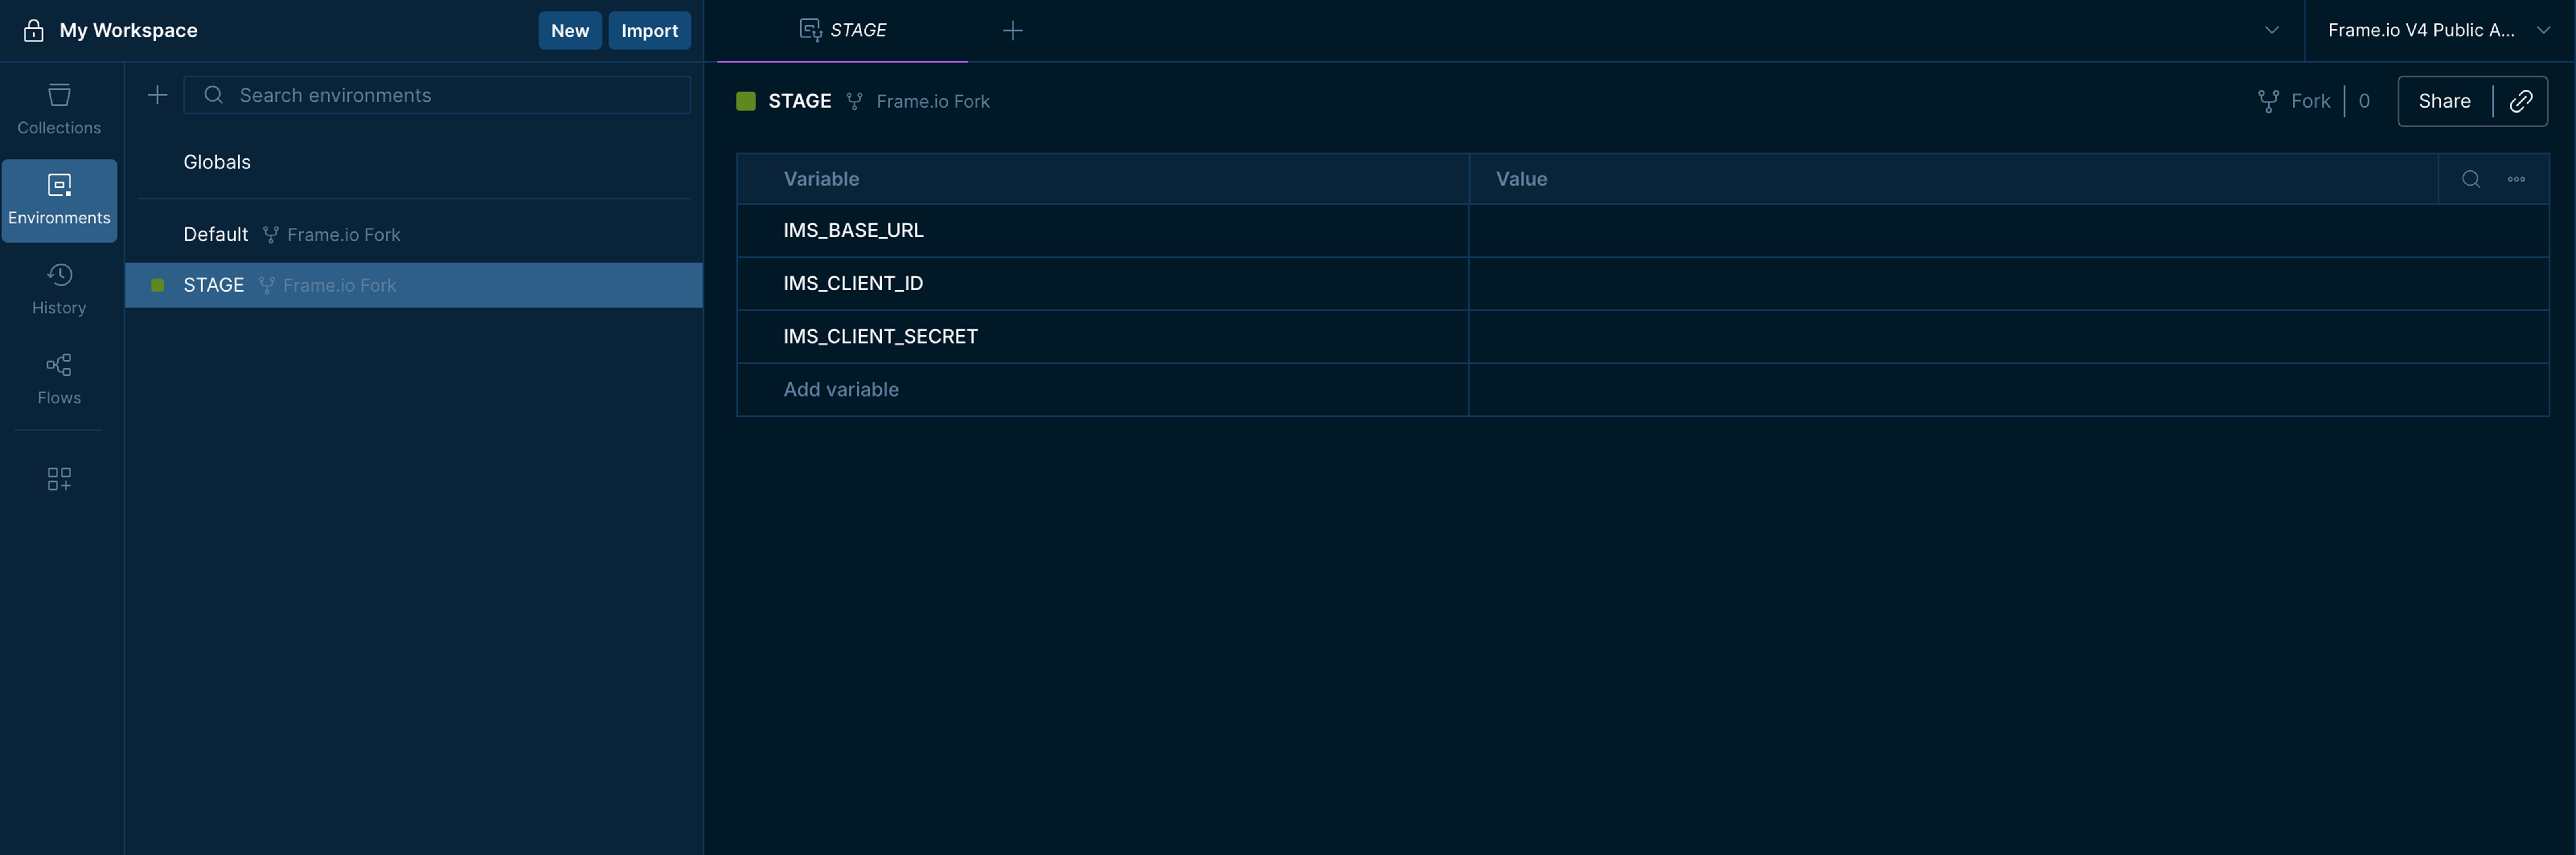
Below is a table with a description of each variable found in the collection’s Default and Stage environments:
| Variable | Description | How to Retrieve | Environment |
|---|---|---|---|
BASE_URL | Base URL for all V4 API requests | Preconfigured, do not edit | Default |
IMS_BASE_URL | Adobe IMS authentication base URL | Preconfigured, do not edit | Default, Stage |
IMS_CLIENT_ID | Your Frame.io App Client ID | Credential page in Adobe Developer Console | Stage |
IMS_CLIENT_SECRET | Your Frame.io App Client Secret | Credential page in Adobe Developer Console | Stage |
FOLDER_ID | Unique ID for the destination folder | Returned in folder response object | Default |
WEBHOOK_ID | Unique ID for a configured webhook | Returned in webhook response object | Default |
ASSET_ID | Unique ID for a file or folder asset | returned in file or folder response object | Default |
SHARE_ID | Unique ID for a share link | returned in share response object | Default |
Setting Up Authorization
This guide uses OAuth 2.0 to authenticate with the Frame.io V4 API. For information on other authentication methods, such as Server-to-Server (S2S), see the Authentication Guide.
The IMS_CLIENT_ID and IMS_CLIENT_SECRET environment variables should be set to the values retrieved from your project’s Credential details in the Adobe Developer Console.
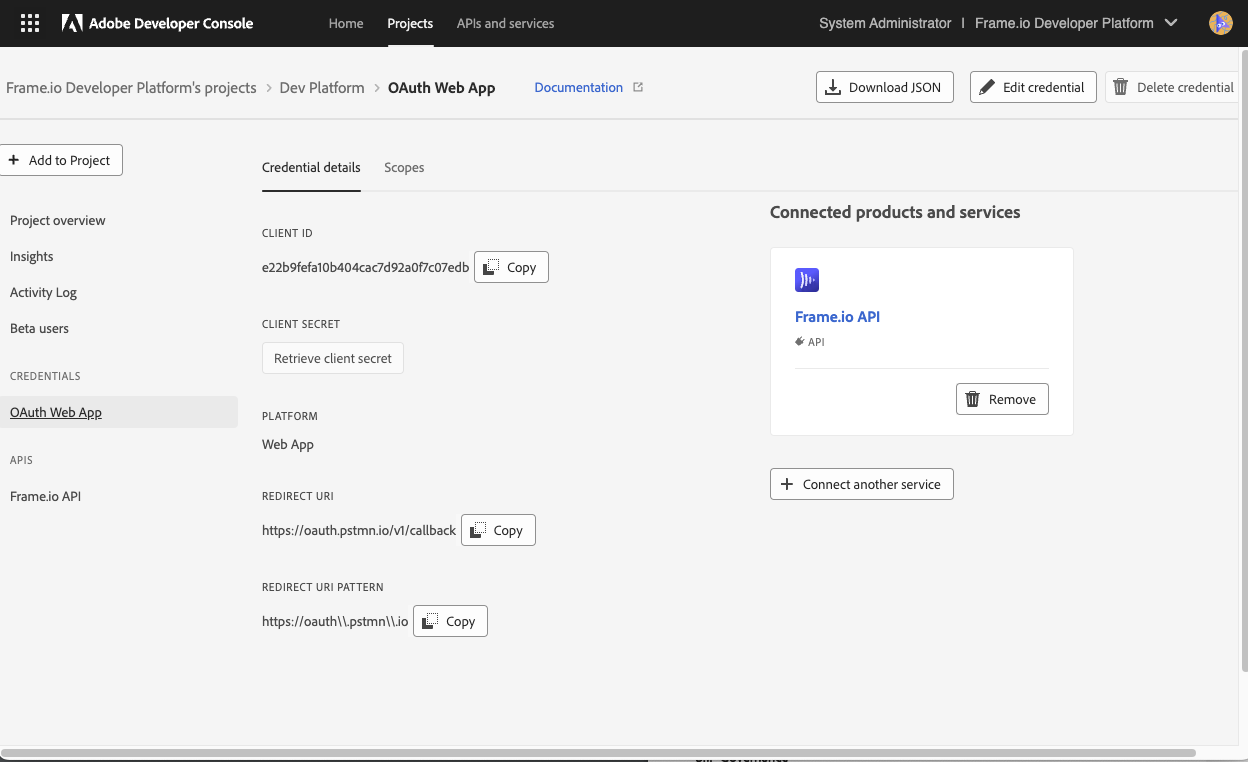
In your project’s Credential details section, set the Redirect URI and Redirect URL Pattern to Postman’s public callback endpoint:
Redirect URI
Redirect URI Pattern
Once environment variables have been set and saved, the next step is configuring authorization settings. To do so, click the Collections icon at the top of the left sidebar to open your collection browser.
From the collection browser, select the root of the Frame.io V4 Developer API collection (usually titled ‘Frame.io Developer API Collection’ followed by your fork name) and select the Authorization tab.
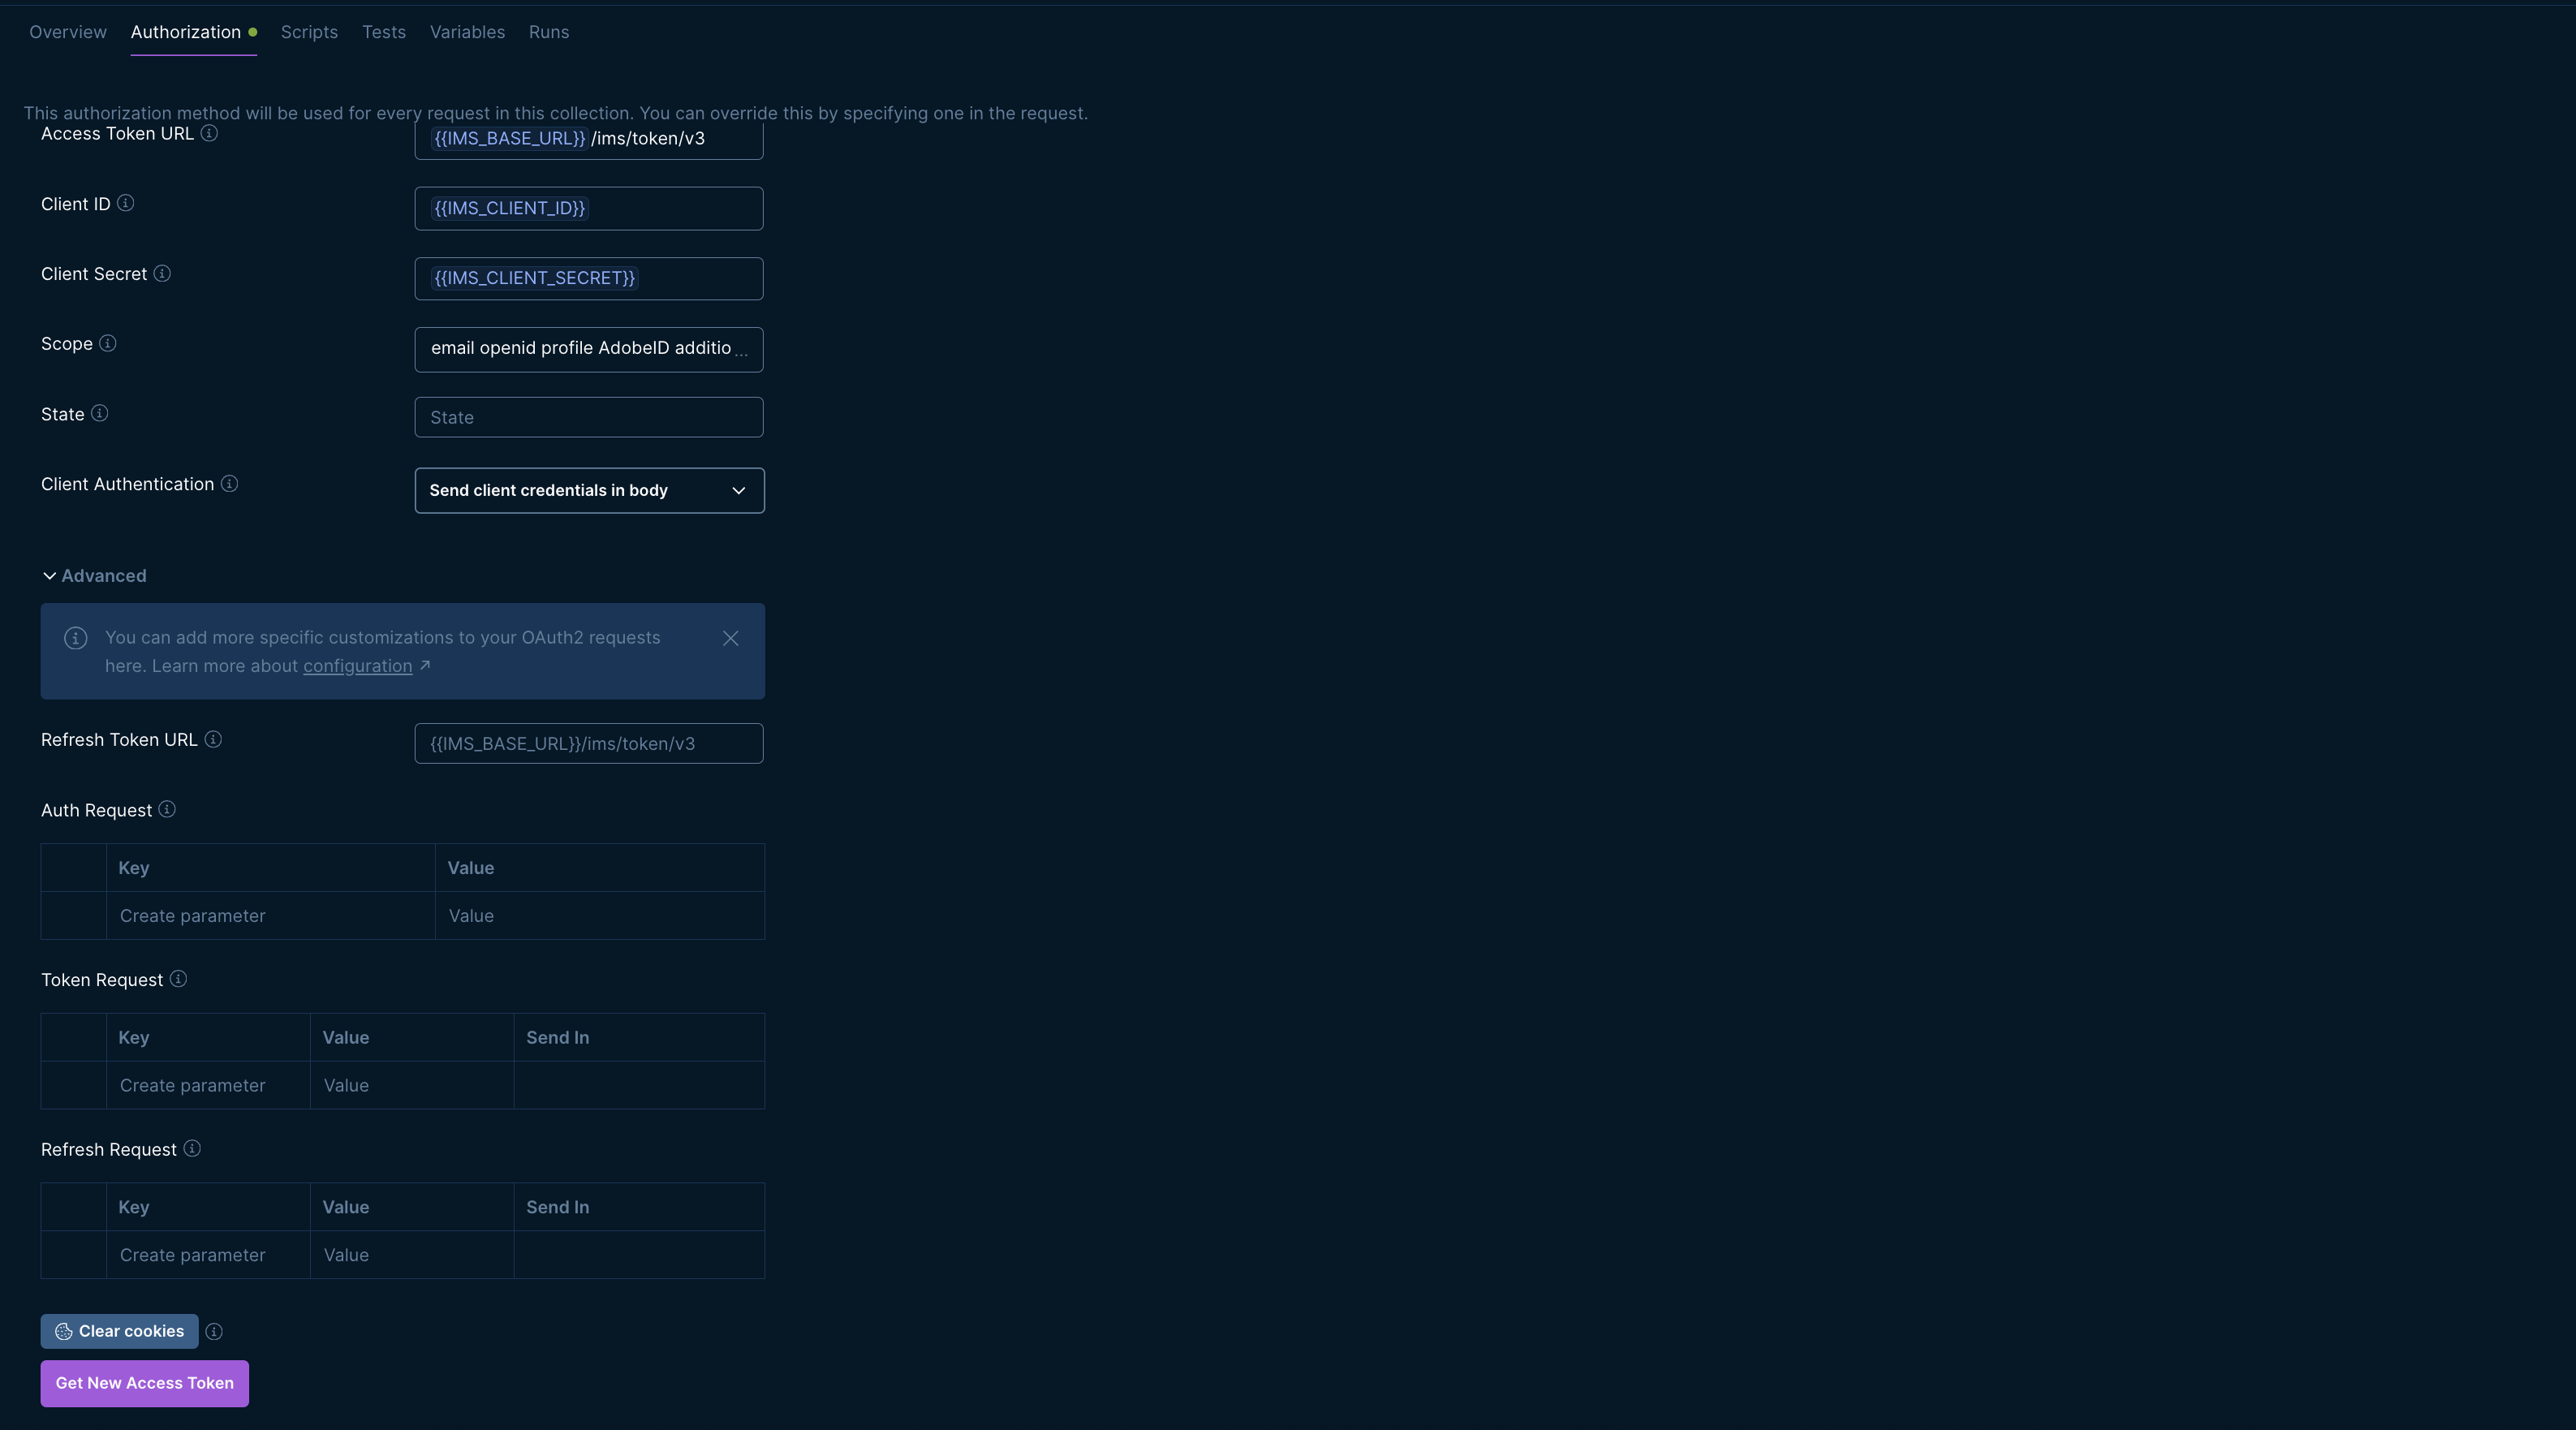
OAuth scopes are pre-configured in the collection. With your environment variables set, use the Get New Access Token button to start the OAuth 2.0 flow. This will open a browser window to complete the authentication process and return the token to Postman.
To verify your authorization configuration, select the GET user details request in the Users folder and click Send.
A 200 OK response confirms both that your collection is configured correctly and that you’ve authenticated to the correct account. If you encounter an error, see this section of the Getting Started guide for information on errors and warnings.
Example Response
Obtaining Your Account ID
account_id is a required path parameter for most V4 API endpoints, and is something you’ll need to test other requests. You can obtain your account_id with the GET List accounts request, located in the collection’s Accounts folder. API Reference
Example Response
If you have multiple Frame.io accounts, each will appear as a separate object in the response
Once you have obtained your Account ID, copy the id value from the response and save it as an environment variable. You’ll reference it as the account_id path parameter using {{ACCOUNT_ID}} in future requests.
Workspace and Project Operations
Your Frame.io files are stored in folders, organized into Projects within Workspaces. For a full overview of the V4 resource hierarchy, see this guide.
Listing Workspaces
The GET list workspaces request in the Workspaces folder calls /v4/accounts/:account_id/workspaces and returns a list of Workspaces your account has access to.
Some Project operations require workspace_id as a path parameter, so save your Workspace ID first if you plan to list or retrieve Projects.
A successful request will return a 200 OK status and a response body similar to the example below.
Example Response
Creating a Workspace
The POST create workspace request calls /v4/accounts/:account_id/workspaces to create a new Workspace for your account.
In the request editor, select the Body tab to set the name of your Workspace within the data object.
A successful request will return a 201 Created status and a response body similar to the example below.
Example Response
Updating a Workspace
The PATCH update workspace request calls /v4/accounts/:account_id/workspaces/:workspace_id to update the name of a Workspace.
In the request editor, select the Body tab to set the new name of your Workspace within the data object.
A successful request will return a 200 OK status and a response body similar to the example below.
Example Response
Creating a Project
The POST create project request calls /v4/accounts/:account_id/workspaces/:workspace_id/projects to create a new Project in a given Workspace.
In the request editor, select the Body tab to set the name of your Project within the data object. The optional restricted property is a Boolean used to create a restricted Project.
A successful request will return a 201 Created status and a response body similar to the example below.
Example Response
Copy the root_folder_id from the response and set it as the value for your FOLDER_ID environment variable. You’ll need this for the remaining sections of this guide.
You can add a user to a newly created restricted Project with a subsequent PATCH Update user role in a Project request located in the Project Permissions folder. (API Reference)
Folder and File Operations
Listing Folder Children
The GET list folder children request calls /v4/accounts/:account_id/folders/:folder_id/children to list the children in a given folder. In this case, the project root folder set as your FOLDER_ID environment variable.
You can use the following optional query parameters to refine your response:
| Parameter | Type | Description |
|---|---|---|
page_size | Integer | Limits the number of returned folders 1-100. Defaults to 50 |
type | String | Filters folder children by resource type: file, or folder |
after | String | Opaque Cursor for requests returning paginated results. This is auto-generated and returned in the links object of the previous response. It is not intended to be human readable. |
include_total_count | Boolean | Returns the total count of all entities Defaults to False |
include | Enum | Appends additional data to each returned object such as creator, project, media_links. For a full list of supported parameters, see API Reference |
A successful request will return a 200 OK status and a response body similar to the example below.
Example Response
Testing the after Parameter
If you are testing paginated results, locate the links object in your response:
- From the
nextproperty URL, copy only the string value followingafter= - Set this as the value of your
afterquery param in your next request. - Watch out for double encoding! If the URL contains encoded characters (ie: %3D%3D) replace them with the raw version (==). Postman interprets your input literally and may double encode these, leading to a
422error
Creating a File - Local Upload
The POST create file - local upload request calls /v4/accounts/:account_id/folders/:folder_id/files/local_upload to upload a local file in a specified folder.
Local uploads require two or more requests depending on file size. For your first test, use a small file (less than 10 MB) to limit the process to a single upload URL.
Create Placeholder File Resource
In the request editor, select the Body tab to set the name and file size (specified in bytes) within the data object. A successful request will return a 201 Created status and a response body similar to the example below.
Example Response
This call has created a placeholder file resource in the specified folder. Use the pre-signed upload URL in the upload_urls array in the response to complete the upload in the next step.
Upload File Content
Click the URL in the upload_urls array in your response to open a new request tab in Postman. Change the request method to PUT. In the request editor, select the Headers tab to add the following headers to your request:
x-amz-acl:privateContent-Type: This must exactly match the extension type specified in the filename (ie: a file namedIMG.pngmust useimage/png)
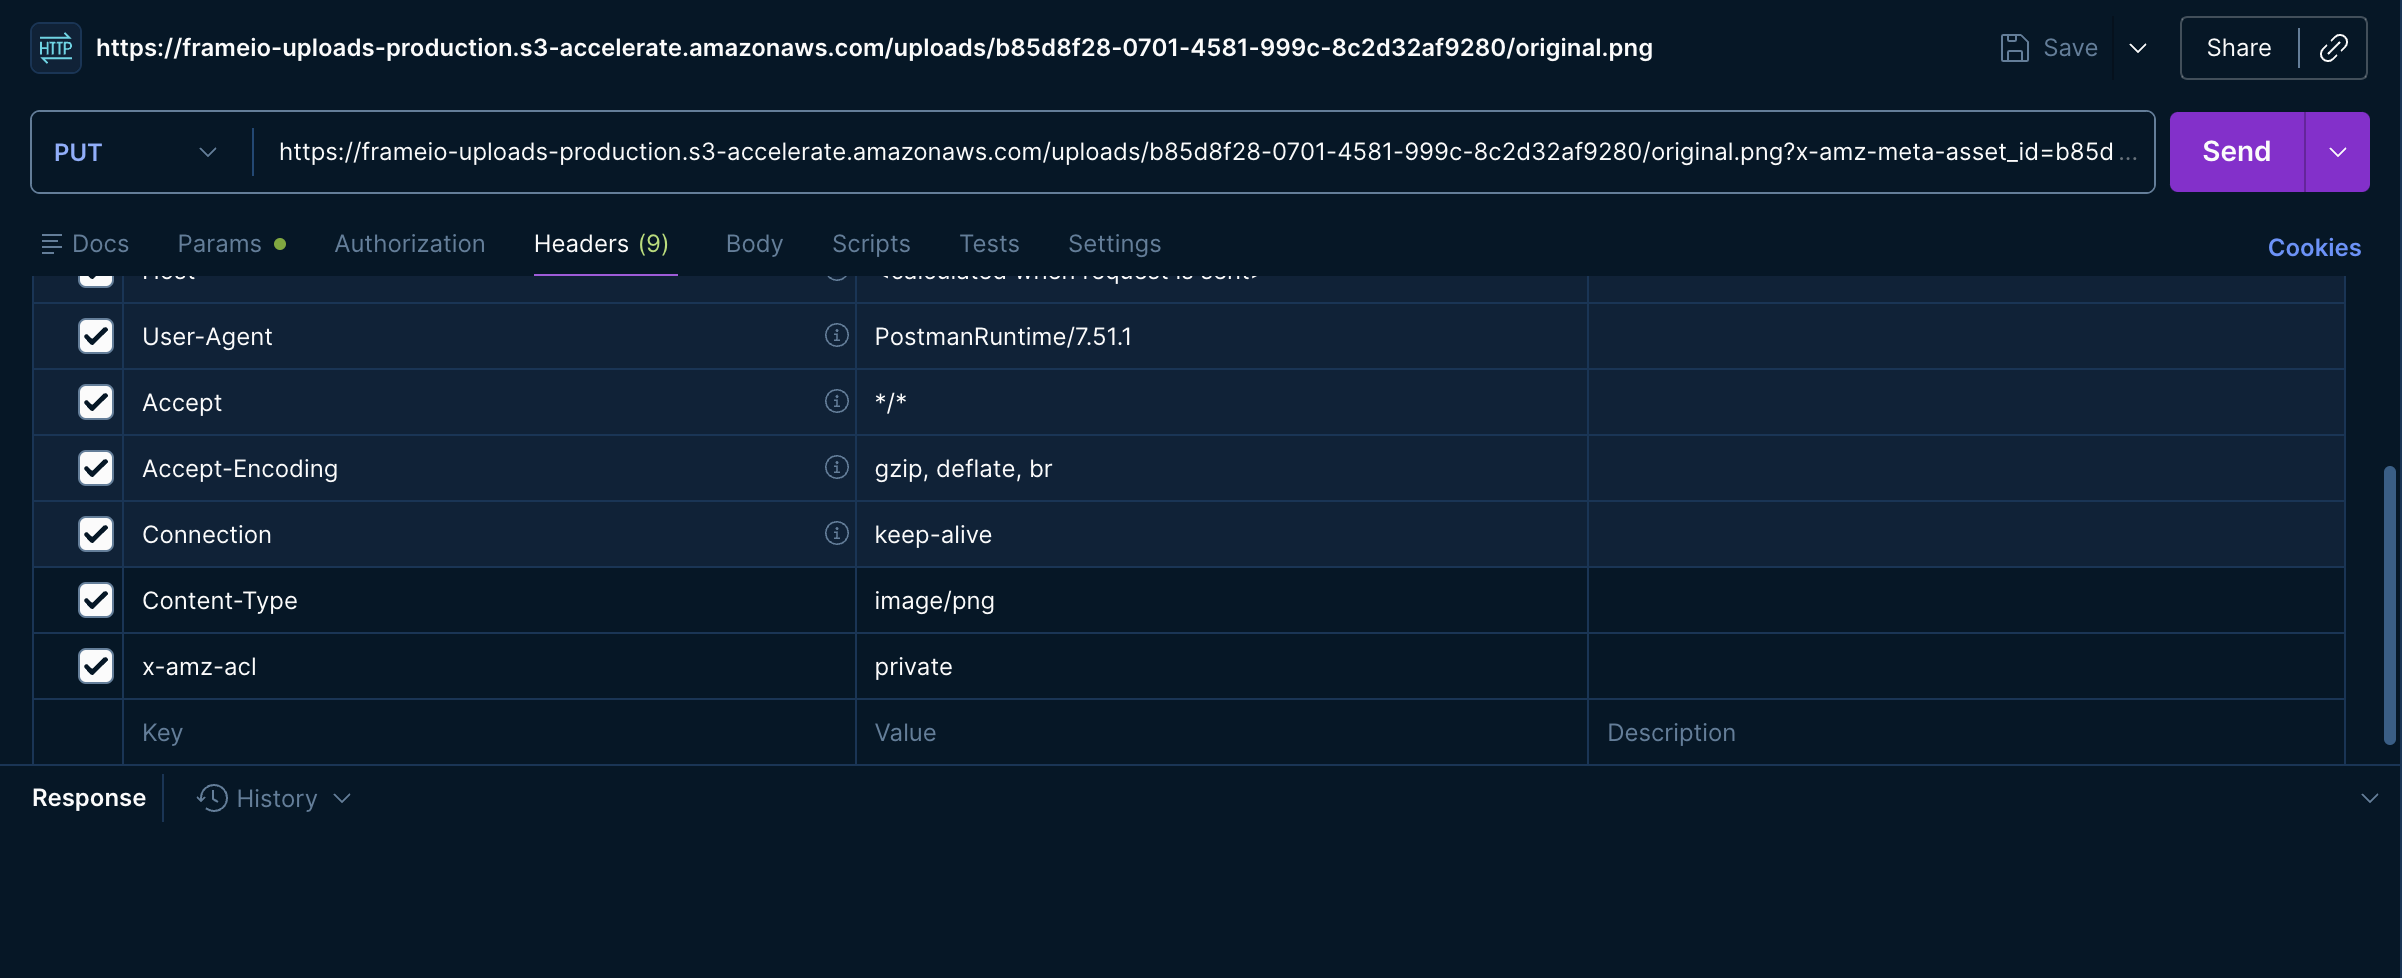 In the request editor select the Body tab and click the binary option to select your file. Once selected click Send to complete your request. A successful request will return a
 200 OK status, confirming your file has been uploaded.
Once your file has been uploaded, the Frame.io media pipeline automatically handles transcoding and thumbnail generation. For larger files, it may take a few moments for the file to move from created to a ready state.
Creating a File - Remote Upload
The POST create file - remote upload request calls /v4/accounts/:account_id/folders/:folder_id/files/remote_upload to pull an external file into a specified folder using a provided source URL.
In the request editor, select the Body tab to set the name and source URL of your file within the data object.
A successful request will return a 202 Accepted status and a response body similar to the example below.
Example Response