방법: 인증

소개

이 가이드는 Frame.io 프로젝트에서 C2C(Camera to Cloud) 디바이스에 대한 인증 및 권한 부여 프로세스를 보여줍니다. 최적의 사용자 경험을 위해 표준 수동 코드 입력 방법과 향상된 QR 코드 페어링 방식을 모두 살펴보겠습니다.

무엇이 필요할까요?

시작하기 전에 구현 전 숙지 사항 가이드를 아직 확인하지 않으셨다면 미리 검토해 주시기 바랍니다. 연동 시스템을 식별하기 위해 저희 팀으로부터 client_secret을 발급받으셨을 것입니다. 아직 발급받지 못했다면 이 C2C 에코시스템 소개를 참조하시고 저희 팀에 문의해 주세요.

URL 및 QR 코드 페어링을 위한 전제 조건

URL 및 QR 코드 페어링을 구현하려면 다음 요구 사항을 충족해야 합니다.

  • 디바이스 호환성: 페어링 프로세스 중에 디바이스가 URL/QR 코드 생성을 지원하는지 확인합니다.

인증 흐름 살펴보기

사용자 관점에서 권한 부여 흐름을 이해하려면 다음 리소스를 참조하세요.

이 인증 프로세스는 구현 요구 사항을 최소화합니다. 다음과 같은 작업을 수행할 필요가 없습니다.

  • 웹 브라우저로 리디렉션(URL 코드 페어링을 사용하는 경우 제외)
  • Frame.io 사용자 인증 처리
  • 계정/프로젝트 선택 인터페이스 제시
  • 기본 정보 표시 외에 복잡한 UI 구성 요소 개발

URL 코드 페어링으로 사용자 경험 향상

현대 사용자는 효율적인 디바이스 상호 작용을 기대합니다. 현재의 수동 페어링 프로세스도 제대로 작동하지만, 이를 더욱 최적화할 수 있습니다.

Netflix나 Disney+와 같은 스트리밍 서비스와 유사하게 URL 및 QR 코드 페어링을 구현하면 프로세스를 크게 간소화하고 입력 오류를 최소화하며 페어링 시간을 단축할 수 있습니다.

디바이스 식별(client_id)

각 물리적 디바이스에는 사용자의 프로젝트 내에서 연결을 추적하기 위한 고유 식별자가 필요합니다.

디바이스의 경우 이 식별자는 client_id이며, 권한 부여 시 필수입니다. 구현할 때 디바이스 일련번호, UUID, 또는 기타 고유 문자열과 같은 적절한 식별자 출처를 고려하세요. Apple 디바이스에 연동하는 경우 디바이스 재부팅 시에도 일관되게 유지되는 고유하고 영구적인 UUID를 사용하는 것이 좋습니다. 개인 식별 정보와 관련하여 주의를 기울이세요. 사용자 이메일 주소는 client_id 값으로 적합하지 않습니다.

또한 식별자를 제어할 수 있어야 합니다. 디바이스 MAC 주소는 귀하의 소프트웨어 소유가 아니며 개인 식별 정보가 될 수 있으므로 적합하지 않습니다.

적절한 식별자 선택에 대한 지침이 필요한 경우 저희 팀에서 연동을 간소화하는 적절한 값을 결정하도록 도와드릴 수 있습니다.

1단계: 디바이스 코드 요청

구현을 시작하려면 /v2/auth/device/code 엔드포인트를 통해 디바이스 코드를 요청합니다.

기존 페어링 방식

curl -X POST https://api.frame.io/v2/auth/device/code \
--form 'client_id=[client_id]' \
--form 'client_secret=[client_secret]' \
--form 'scope=asset_create offline' \
| python -m json.tool

URL 코드 페어링 활성화

URL 코드 페어링의 경우 추가 헤더를 포함하여 API 호출을 수정합니다.

curl -X POST https://api.frame.io/v2/auth/device/code \
--header "x-client-version: 2.0.0" \
--header "x-client-platypus-enabled: true" \ # New header to enable URL pairing
--form 'client_id=[client_id]' \
--form 'client_secret=[client_secret]' \
--form 'scope=asset_create offline' \
| python -m json.tool

참고: 이러한 인증 엔드포인트는 JSON이 아닌 양식 데이터만 허용합니다. 인증 후 다른 엔드포인트는 JSON 페이로드를 허용하지만, 인증 엔드포인트는 JSON 요청을 거부합니다.

페이로드 매개변수

  • client_id: 물리적 디바이스의 고유 식별자입니다. 일련번호나 UUID와 같이 고유성이 보장되어야 합니다.

  • client_secret: 디바이스 모델을 식별하기 위해 Frame.io 지원팀에서 제공합니다. 이 기밀 값은 사용자로부터 보호되어야 하며 저장 시 암호화되어야 합니다.

  • scope: 요청된 권한이며 공백으로 구분됩니다. 디바이스는 다음을 요청할 수 있습니다.

  • asset_create: 에셋 생성 및 업로드를 활성화합니다. * offline: 새로 고침 토큰을 통한 권한 새로 고침을 허용합니다. 이 권한이 없으면 권한 부여 토큰이 만료되므로 사용자는 8시간마다 디바이스를 다시 인증해야 합니다.

실제 구현 시 디바이스는 일반적으로 두 가지 권한을 모두 요청합니다.

API 응답 이해

이 요청은 다음과 유사한 응답을 생성합니다.

기존 페어링 응답

{
"device_code": "[device_code]",
"expires_in": 120,
"interval": 5,
"name": "MyDevice-[client_id]",
"user_code": "573131"
}

URL 페어링 응답

{
"device_code": "[device_code]",
"expires_in": 120,
"interval": 5,
"name": "MyDevice-[client_id]",
"user_code": "573131",
"verification_uri": "https://next.frame.io/pair",
"verification_uri_complete": "https://next.frame.io/pair/573131"
}

응답 분석

  • device_code: 이 내부 식별자는 사용자에게 숨겨져 있어야 하며, 폴링 중에 인증 요청을 식별합니다.
  • expires_in: 코드의 유효 기간(초 단위)입니다.
  • interval: 권장되는 폴링 간격(초 단위)입니다.
  • name: 연결 중인 디바이스의 식별자입니다.
  • user_code: 디바이스 페어링을 위해 Frame.io에 수동으로 입력하는 6자리 코드입니다.
  • verification_uri: QR 스캔을 사용할 수 없을 때 수동 입력을 위한 기본 URL입니다.
  • verification_uri_complete: 페어링 코드가 포함된 전체 URL로, 사용자가 페어링 인터페이스로 쉽게 이동할 수 있도록 모바일 앱 내 하이퍼링크나 QR 코드 생성에 사용됩니다.

사용자에게 QR 코드 표시

verification_uri_complete를 사용하여 QR 코드를 생성하고 디바이스 화면에 표시하여 사용자가 스캔할 수 있도록 함으로써 효율적인 페어링을 돕습니다.

예시: QR 코드가 표시된 디바이스 화면
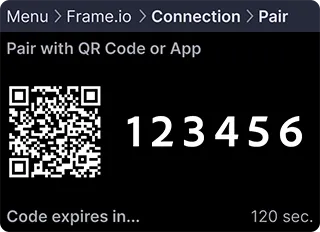
디바이스 QR 코드 페어링 화면 예시 항상 대체 옵션을 제공하세요. QR 스캔이 불가능한 경우 수동 입력을 위해 user_codeverification_uri를 표시해야 합니다. 또는 모바일 스캔을 위해 verification_uri를 정적 QR 코드로 표시하는 것을 고려해 보세요. 모바일 앱 연동의 경우 사용자가 앱이 실행 중인 디바이스에서 QR 코드를 스캔할 수 없으므로 verification_uri_complete를 탭할 수 있는 하이퍼링크로 포함합니다.

2단계: 사용자 권한 부여 폴링

페어링 코드 또는 URL 코드를 제공한 후 다음 요청으로 사용자 입력을 확인합니다.

curl -X POST https://api.frame.io/v2/auth/token \
--form 'client_id=[client_id]' \
--form 'device_code=[device_code]' \
--form 'grant_type=urn:ietf:params:oauth:grant-type:device_code' \
| python -m json.tool

페이로드 매개변수

  • client_id: 1단계에서 사용된 것과 동일한 식별자입니다.
  • device_code: 이전에 반환된 device_code 값입니다.
  • grant_type: OAuth 권한 부여 유형 식별자이며, 이 구현의 경우 항상 urn:ietf:params:oauth:grant-type:device_code입니다.

초기 폴링 시도는 일반적으로 다음을 반환합니다.

{
"error": "authorization_pending"
}

이 오류는 시스템 오류가 아니며 사용자가 코드 입력을 완료하지 않았음을 나타냅니다. 완료될 때까지 폴링을 계속합니다.

iOS 앱 디바이스 참고 사항: 사용자가 페어링 코드를 입력하기 위해 Frame.io iOS 앱으로 전환하면 귀하의 앱이 백그라운드로 이동할 수 있습니다. applicationDidBecomeActive 등에서 앱이 다시 활성화되면 사용자가 페어링을 처음부터 다시 시작할 필요 없이 권한 부여 흐름이 계속될 수 있도록 폴링을 재개합니다.

다음을 받은 경우:

{
"error": "expired_token"
}

사용자가 입력하기 전에 코드가 만료되었습니다. 1단계를 통해 새 코드/QR 코드를 생성하여 사용자에게 표시하고 폴링을 재개합니다.

권한 부여에 성공하면 다음이 생성됩니다.

{
"access_token": "[access_token]",
"expires_in": 28800,
"refresh_token": "[refresh_token]",
"token_type": "bearer"
}

Camera to Cloud 디바이스의 권한 부여를 성공적으로 완료하신 것을 축하합니다!

이 응답을 살펴보겠습니다.

  • access_token: Frame.io 백엔드 액세스를 위한 인증 자격 증명으로, 향후 API 요청의 헤더에 필요합니다.
  • expires_in: 액세스 토큰의 유효 기간(초)이며, 이 기간이 지나면 새로 고침이 필요합니다.
  • refresh_token: 액세스 토큰 관리에 사용되며, 주로 권한 부여를 새로 고칠 때 사용되지만 권한 취소에도 적용할 수 있습니다.
  • token_type: C2C API 구현의 경우 항상 bearer이므로 별도의 조치가 필요하지 않습니다.

단계 조합하기

이제 이러한 API 호출을 Python 형태의 의사 코드로 구현하여 디바이스 코드 만료 가능성을 처리해 보겠습니다.

Python
1def authorize_with_frame():
2 """
3 Handles authorizing our device with Frame.io.
4 """
5
6 # Our client ID can be a serial number, UUID, or some other unique string.
7 client_id = THIS_DEVICE.get_serial_number()
8
9 while True:
10 # Make the call to Frame.io to get our device codes.
11 pairing_codes = c2c.get_device_codes(client_id)
12
13 # We need to keep track of how long we have been polling for
14 polling_started = datetime.now()
15
16 # Now we are going to poll for authorization until the user enters the code.
17 while True:
18
19 # Re-write this output each time we poll. Note: This message will only update once
20 # per `interval` (e.g., 5 seconds), so if a smooth countdown is desired, that will
21 # need a different implementation.
22 print(
23 f"\rPAIRING CODE: {pairing_codes.user_code}, "
24 f"EXPIRES IN: {pairing_codes.expires_in - (datetime.now() - polling_started).seconds} seconds"
25 )
26
27 # Wait for `interval` before polling each time.
28 sleep(pairing_codes.interval)
29
30 # Make a call to Frame.io to see if the user has entered the code and authorized
31 # the device.
32 authorization, error = c2c.poll_for_authorization(
33 client_id, pairing_codes.device_code
34 )
35
36 if error and error.message == "authorization_pending":
37 # If the authorization is pending, try again.
38 continue
39 elif error and error.message == "expired_token":
40 # If the pairing codes have expired, break to generate new codes.
41 break
42 elif error:
43 # If there was some other error, raise it.
44 raise error
45 else:
46 # If there was no error, we have our authorization!
47 return authorization
48
49 # If we get here, our pairing codes expired. Let's try again.
50 print("\nPairing code expired. Generating a new one...")

참고: 외부 루프는 페어링 코드가 만료되어 새 코드가 필요한 경우를 처리합니다.

마지막 단계로 Frame.io에서 프로젝트 정보를 검색하고 표시하여 의도한 프로젝트에 성공적으로 페어링되었는지 확인합니다. 이 내용은 다음 튜토리얼에서 다루겠습니다.

페어링용 QR 코드 생성 및 표시

URL/QR 코드 페어링을 구현할 때 응답의 verification_uri_complete 값에서 QR 코드를 생성해야 합니다. 다음은 다양한 프로그래밍 언어에서 널리 사용되는 라이브러리를 사용한 예시입니다.

qrcode를 사용한 Python 예시

Python
1import qrcode
2from PIL import Image
3import io
4
5def generate_qr_code(verification_uri_complete, size=250):
6 """
7 Generate a QR code from the verification_uri_complete URL.
8
9 Args:
10 verification_uri_complete (str): The complete verification URI returned by Frame.io
11 size (int, optional): Size of the QR code in pixels. Defaults to 250.
12
13 Returns:
14 PIL.Image: QR code image that can be displayed or saved
15 """
16 qr = qrcode.QRCode(
17 version=1,
18 error_correction=qrcode.constants.ERROR_CORRECT_L,
19 box_size=10,
20 border=4,
21 )
22 qr.add_data(verification_uri_complete)
23 qr.make(fit=True)
24
25 img = qr.make_image(fill_color="black", back_color="white")
26
27 # Resize the image if needed
28 img = img.resize((size, size))
29 return img
30
31# Example usage in authorization flow
32def display_qr_for_pairing(pairing_codes):
33 """
34 Generate and display QR code along with manual pairing instructions.
35 """
36 if hasattr(pairing_codes, 'verification_uri_complete'):
37 # Generate QR code from the verification URI
38 qr_img = generate_qr_code(pairing_codes.verification_uri_complete)
39
40 # Display the QR code on screen
41 # For GUI applications like Tkinter, PyQt, etc.
42 # display_image(qr_img)
43
44 # For headless devices or testing, save to file
45 qr_img.save("frame_io_pairing_qr.png")
46
47 print(f"Scan the QR code or visit: {pairing_codes.verification_uri}")
48 print(f"Manual code: {pairing_codes.user_code}")
49 else:
50 # Fallback for devices that received traditional pairing response
51 print(f"Enter code on Frame.io: {pairing_codes.user_code}")

JavaScript 예시(웹 또는 Electron)

1import QRCode from 'qrcode';
2
3/**
4 * Generate and display a QR code from the verification URI
5 * @param {string} verificationUriComplete - The complete verification URI from Frame.io
6 * @param {string} elementId - ID of the HTML element to display the QR code in
7 */
8function displayQRCode(verificationUriComplete, elementId = 'qrcode-container') {
9 const element = document.getElementById(elementId);
10
11 if (!element) {
12 console.error(`Element with ID ${elementId} not found`);
13 return;
14 }
15
16 // Clear any existing content
17 element.innerHTML = '';
18
19 // Generate QR code
20 QRCode.toCanvas(element, verificationUriComplete, { width: 250 }, function(error) {
21 if (error) {
22 console.error('Error generating QR code:', error);
23 // Fallback to displaying the URL as a link
24 element.innerHTML = `<a href="${verificationUriComplete}" target="_blank">Click here to pair</a>`;
25 }
26 });
27
28 // Also display manual pairing information
29 const manualInfoDiv = document.createElement('div');
30 manualInfoDiv.innerHTML = `
31 <p>Scan the QR code or <a href="${verificationUriComplete}" target="_blank">click here</a> to pair your device.</p>
32 <p>Manual code: ${userCode}</p>
33 `;
34 element.parentNode.appendChild(manualInfoDiv);
35}
36
37// Example usage in authorization flow
38async function requestDeviceCode() {
39 try {
40 const response = await fetch('https://api.frame.io/v2/auth/device/code', {
41 method: 'POST',
42 headers: {
43 'x-client-version': '2.0.0',
44 'x-client-platypus-enabled': 'true'
45 },
46 body: new URLSearchParams({
47 'client_id': YOUR_CLIENT_ID,
48 'client_secret': YOUR_CLIENT_SECRET,
49 'scope': 'asset_create offline'
50 })
51 });
52
53 const data = await response.json();
54
55 if (data.verification_uri_complete) {
56 displayQRCode(data.verification_uri_complete);
57 window.userCode = data.user_code; // Store for display purposes
58 } else {
59 // Fallback for traditional pairing
60 displayManualPairingCode(data.user_code);
61 }
62
63 // Begin polling for authorization
64 beginPollingForAuthorization(data.device_code, data.interval);
65
66 } catch (error) {
67 console.error('Error requesting device code:', error);
68 }
69}

Android 예시(Java)

1import android.graphics.Bitmap;
2import android.widget.ImageView;
3import com.google.zxing.BarcodeFormat;
4import com.google.zxing.MultiFormatWriter;
5import com.google.zxing.common.BitMatrix;
6import com.journeyapps.barcodescanner.BarcodeEncoder;
7
8public void generateAndDisplayQRCode(String verificationUriComplete, ImageView qrCodeImageView) {
9 try {
10 MultiFormatWriter multiFormatWriter = new MultiFormatWriter();
11 BitMatrix bitMatrix = multiFormatWriter.encode(verificationUriComplete,
12 BarcodeFormat.QR_CODE, 250, 250);
13 BarcodeEncoder barcodeEncoder = new BarcodeEncoder();
14 Bitmap bitmap = barcodeEncoder.createBitmap(bitMatrix);
15
16 // Display in ImageView
17 qrCodeImageView.setImageBitmap(bitmap);
18
19 } catch (Exception e) {
20 e.printStackTrace();
21 // Fallback to displaying the URL as text
22 }
23}

iOS 예시(Swift)

1import UIKit
2import CoreImage
3
4func generateQRCode(from string: String) -> UIImage? {
5 let data = string.data(using: String.Encoding.utf8)
6
7 if let filter = CIFilter(name: "CIQRCodeGenerator") {
8 filter.setValue(data, forKey: "inputMessage")
9 filter.setValue("H", forKey: "inputCorrectionLevel")
10
11 if let outputImage = filter.outputImage {
12 // Scale the image
13 let transform = CGAffineTransform(scaleX: 10, y: 10)
14 let scaledImage = outputImage.transformed(by: transform)
15
16 // Convert to UIImage
17 let context = CIContext()
18 if let cgImage = context.createCGImage(scaledImage, from: scaledImage.extent) {
19 return UIImage(cgImage: cgImage)
20 }
21 }
22 }
23
24 return nil
25}
26
27// Usage in your view controller
28func displayPairingQRCode(verificationUriComplete: String) {
29 if let qrCodeImage = generateQRCode(from: verificationUriComplete) {
30 qrCodeImageView.image = qrCodeImage
31
32 // Also show manual pairing information
33 pairingInstructionsLabel.text = "Scan the QR code or enter code manually"
34 pairingCodeLabel.text = userCode
35 } else {
36 // Fallback to manual code display
37 pairingInstructionsLabel.text = "Enter this code on Frame.io:"
38 pairingCodeLabel.text = userCode
39 }
40}

QR 코드 표시 모범 사례

QR 코드 페어링을 구현할 때 최상의 사용자 경험을 위해 다음 가이드라인을 고려하세요.

  1. 최적의 크기: 안정적인 스캔을 위해 QR 코드를 가로세로 최소 200~250픽셀 크기로 표시합니다.

  2. 대비: QR 코드와 배경 사이에 높은 대비를 확보합니다(흰색 배경에 검은색이 이상적).

  3. 오류 수정: 코드 밀도와 안정성의 균형을 맞추기 위해 중간 수준의 오류 수정(L 또는 M)을 사용합니다.

  4. 명확한 지침: “스마트폰 카메라로 이 코드를 스캔하여 디바이스를 페어링하세요”와 같이 코드를 스캔하는 방법에 대한 명확한 안내를 제공합니다.

  5. 여러 옵션: 항상 QR 코드와 함께 수동 페어링 코드를 대체 수단으로 제공합니다.

Scan to pair:
[QR CODE]
Or enter code manually: 573131
  1. 모바일 앱용 하이퍼링크: 연동 시스템이 모바일 애플리케이션인 경우, 사용자가 앱이 실행 중인 동일한 디바이스에서 QR 코드를 스캔할 수 없으므로 verification_uri_complete를 탭할 수 있는 링크로 포함합니다.

  2. 테스트: 안정적인 스캔을 보장하기 위해 다양한 디바이스와 조명 조건에서 QR 코드를 테스트합니다.

QR 코드 표시 예시

문제 해결

문제가 발생하면 다음의 일반적인 시나리오와 해결 방법을 참조하세요.

  • “디바이스 연결” 버튼이 표시되지 않음: C2C 관리 패널에 액세스할 때 이 문제는 다음을 나타낼 수 있습니다.

  • 권한 부족: 권한 메시지가 표시되면 계정 관리자에게 문의하여 권한을 조정하거나 적절한 역할을 할당받으세요. * 기존 디바이스 연결: 디바이스를 하나 연결한 후에는 기본 “새 디바이스 추가” 버튼이 C2C 연결 패널 우측 상단의 점 3개 메뉴로 바뀝니다.

  • 잘못된 클라이언트 오류: invalid_client 응답은 디바이스 정보 불일치를 나타내며, 일반적으로 client_secret이 올바르지 않기 때문에 발생합니다.

  • 잘못된 요청 오류: bad_request 응답은 요청 데이터 형식이 잘못되었음을 나타냅니다. 필드 이름을 확인하고 필수 필드가 모두 포함되었는지 확인합니다.

문제가 여기서 해결되지 않은 경우, 이 문제 해결 섹션을 개선할 수 있도록 겪으신 상황을 공유해 주세요.

다음 단계

저희 팀에 문의하신 후 권한 부여 관리 가이드로 계속 진행하시기 바랍니다. 여러분의 피드백을 기다리겠습니다!