操作指南:授权

前言

本指南演示了在 Frame.io 项目中对 Camera to Cloud (C2C) 设备进行身份验证和授权的流程。 我们将探讨标准的手动代码输入方法和增强的 QR 代码配对方法,以实现最佳用户体验。

我需要准备什么?

如果您还未阅读开始实施之前的准备指南,请先查阅该指南。 您应该已收到我们团队提供的 client_secret,用于标识您的集成。 如果没有收到,请查阅这份 C2C 生态系统简介,并联系我们的团队。

URL 和 QR 代码配对的前提条件

要实施 URL 和 QR 代码配对,请确保您满足以下要求:

  • 设备兼容性:确认您的设备支持在配对过程中生成 URL/QR 代码。

授权流程详解

要从用户角度理解授权流程,请参考以下资源:

此授权流程最大程度地减少了实施要求。 您无需:

  • 重定向到 Web 浏览器(除非使用 URL 代码配对)
  • 处理 Frame.io 用户身份验证
  • 显示帐户/项目选择界面
  • 开发超出基本信息展示范围的复杂 UI 组件

通过 URL 代码配对提升用户体验

现代用户期望高效的设备交互。 虽然当前的手动配对流程功能上足够用,但仍可进一步优化。

通过实施 URL 和 QR 代码配对(类似于 Netflix 或 Disney+ 等流媒体服务),我们可以显著简化流程、最大限度地减少输入错误并缩短配对时间。

设备标识 (client_id)

每个物理设备都需要一个唯一标识符,用于在用户项目内进行连接跟踪。

对于设备而言,此标识符就是 client_id,它在授权过程中至关重要。 在实施时,请考虑合适的标识符来源,例如设备序列号、UUID 或其他唯一字符串。 如果您是在 Apple 设备上进行集成,我们建议使用一个在设备重启后保持不变的唯一持久 UUID。 请谨慎处理个人身份信息。 用户电子邮件地址不适合用作 client_id 的值。

此外,请确保您能控制该标识符。 设备 MAC 地址不适用,因为它们不属于您的软件,并且可能构成个人身份信息。

如果您在选择合适的标识符方面需要指导,我们的团队可以协助您确定一个合适的值,从而简化集成。

步骤 1:请求设备代码

要开始实施,请通过 /v2/auth/device/code 端点请求设备代码:

传统配对方法

curl -X POST https://api.frame.io/v2/auth/device/code \
--form 'client_id=[client_id]' \
--form 'client_secret=[client_secret]' \
--form 'scope=asset_create offline' \
| python -m json.tool

启用 URL 代码配对

对于 URL 代码配对,请通过添加额外的标头来修改 API 调用:

curl -X POST https://api.frame.io/v2/auth/device/code \
--header "x-client-version: 2.0.0" \
--header "x-client-platypus-enabled: true" \ # New header to enable URL pairing
--form 'client_id=[client_id]' \
--form 'client_secret=[client_secret]' \
--form 'scope=asset_create offline' \
| python -m json.tool

**注意:**这些身份验证端点仅接受表单数据,不接受 JSON。 身份验证后,其他端点将接受 JSON 负载,但身份验证端点将拒绝 JSON 请求。

负载参数

  • client_id:您物理设备的唯一标识符。 这必须保证唯一性,例如序列号或 UUID。

  • client_secret:由 Frame.io 支持团队提供,用于标识您的设备型号。 此机密值应避免向用户泄露,并在存储时进行加密。

  • scope:请求的权限范围,用空格分隔。 设备可以请求:

  • asset_create:允许创建和上传资产。 * offline:允许通过刷新令牌进行授权刷新。 如果没有此权限范围,由于授权令牌会过期,用户需要每 8 小时就重新授权一次他们的设备。

在实际实施中,设备通常会同时请求这两个权限范围。

理解 API 响应

该请求会生成一个类似如下的响应:

传统配对响应

{
"device_code": "[device_code]",
"expires_in": 120,
"interval": 5,
"name": "MyDevice-[client_id]",
"user_code": "573131"
}

URL 配对响应

{
"device_code": "[device_code]",
"expires_in": 120,
"interval": 5,
"name": "MyDevice-[client_id]",
"user_code": "573131",
"verification_uri": "https://next.frame.io/pair",
"verification_uri_complete": "https://next.frame.io/pair/573131"
}

响应细分

  • device_code:此内部标识符应对用户隐藏,用于在轮询期间识别授权请求。
  • expires_in:代码的有效期(以秒为单位)。
  • interval:推荐的轮询间隔(以秒为单位)。
  • name:所连接设备的标识符。
  • user_code:用于手动输入到 Frame.io 进行设备配对的六位数代码。
  • verification_uri:在无法扫描 QR 代码时进行手动输入的基础 URL。
  • verification_uri_complete:包含配对代码的完整 URL,用于在移动应用程序内生成超链接或生成 QR 代码,从而简化用户导航到配对界面的过程。

向用户显示 QR 代码

使用 verification_uri_complete,在设备屏幕上生成并显示一个 QR 代码供用户扫描,从而实现高效配对。

示例:显示 QR 代码的设备屏幕
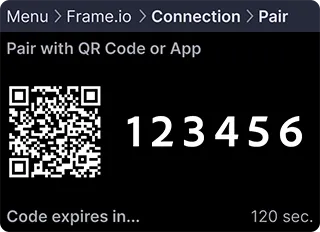
示例设备 QR 代码配对屏幕请务必提供备选方案:当无法扫描 QR 代码时,显示 user_codeverification_uri 以供手动输入。 或者,考虑将 verification_uri 显示为静态 QR 代码供移动设备扫描。 对于移动应用程序集成,请将 verification_uri_complete 作为可点击的超链接,因为用户无法从运行该应用程序的设备扫描 QR 代码。

步骤 2:轮询用户授权

在提供配对代码或 URL 代码后,使用以下请求来验证用户输入:

curl -X POST https://api.frame.io/v2/auth/token \
--form 'client_id=[client_id]' \
--form 'device_code=[device_code]' \
--form 'grant_type=urn:ietf:params:oauth:grant-type:device_code' \
| python -m json.tool

负载参数

  • client_id:与步骤 1 中使用的标识符相同。
  • device_code:之前返回的 device_code 值。
  • grant_type:OAuth 授权类型标识符,在此实施中固定为 urn:ietf:params:oauth:grant-type:device_code

初始轮询尝试通常返回:

{
"error": "authorization_pending"
}

此非致命错误表示用户尚未完成代码输入。 继续轮询,直至完成。

**iOS 应用程序设备的注意事项:**如果用户切换到 Frame.io iOS 应用程序来输入配对代码,您的应用程序可能会进入后台运行。 当您的应用程序再次恢复活动状态时(例如在 applicationDidBecomeActive 中),请恢复轮询,以便授权流可以继续进行,而无需用户重新启动配对。

如果您收到:

{
"error": "expired_token"
}

代码在用户输入之前已过期。 通过步骤 1 生成新的代码/QR 代码,将其展示给用户,然后恢复轮询。

成功授权后将产生:

{
"access_token": "[access_token]",
"expires_in": 28800,
"refresh_token": "[refresh_token]",
"token_type": "bearer"
}

恭喜您已成功授权您的 Camera to Cloud 设备!

让我们来查看此响应:

  • access_token:您访问 Frame.io 后端的身份验证凭据,在后续 API 请求的标头中需要用到此凭据。
  • expires_in:访问令牌的有效期(以秒为单位),过期后需要刷新。
  • refresh_token:用于访问令牌管理,主要用于刷新授权,但也适用于撤销。
  • token_type:对于 C2C API 实施,始终为 bearer,无需任何操作。

将各个步骤整合起来

现在,让我们用类似 Python 的伪代码来实施这些 API 调用,并处理可能出现的设备代码过期情况:

Python
1def authorize_with_frame():
2 """
3 Handles authorizing our device with Frame.io.
4 """
5
6 # Our client ID can be a serial number, UUID, or some other unique string.
7 client_id = THIS_DEVICE.get_serial_number()
8
9 while True:
10 # Make the call to Frame.io to get our device codes.
11 pairing_codes = c2c.get_device_codes(client_id)
12
13 # We need to keep track of how long we have been polling for
14 polling_started = datetime.now()
15
16 # Now we are going to poll for authorization until the user enters the code.
17 while True:
18
19 # Re-write this output each time we poll. Note: This message will only update once
20 # per `interval` (e.g., 5 seconds), so if a smooth countdown is desired, that will
21 # need a different implementation.
22 print(
23 f"\rPAIRING CODE: {pairing_codes.user_code}, "
24 f"EXPIRES IN: {pairing_codes.expires_in - (datetime.now() - polling_started).seconds} seconds"
25 )
26
27 # Wait for `interval` before polling each time.
28 sleep(pairing_codes.interval)
29
30 # Make a call to Frame.io to see if the user has entered the code and authorized
31 # the device.
32 authorization, error = c2c.poll_for_authorization(
33 client_id, pairing_codes.device_code
34 )
35
36 if error and error.message == "authorization_pending":
37 # If the authorization is pending, try again.
38 continue
39 elif error and error.message == "expired_token":
40 # If the pairing codes have expired, break to generate new codes.
41 break
42 elif error:
43 # If there was some other error, raise it.
44 raise error
45 else:
46 # If there was no error, we have our authorization!
47 return authorization
48
49 # If we get here, our pairing codes expired. Let's try again.
50 print("\nPairing code expired. Generating a new one...")

**注意:**外层循环处理配对代码过期且需要新代码的情况。

最后一步,从 Frame.io 检索并显示项目信息,以确认已成功配对到目标项目。 我们将在下一个教程中介绍这一点。

为配对创建并显示 QR 代码

实施 URL/QR 代码配对时,您需要根据响应中的 verification_uri_complete 值生成一个 QR 代码。 以下是使用不同编程语言中的热门库的示例:

使用 qrcode 库的 Python 示例

Python
1import qrcode
2from PIL import Image
3import io
4
5def generate_qr_code(verification_uri_complete, size=250):
6 """
7 Generate a QR code from the verification_uri_complete URL.
8
9 Args:
10 verification_uri_complete (str): The complete verification URI returned by Frame.io
11 size (int, optional): Size of the QR code in pixels. Defaults to 250.
12
13 Returns:
14 PIL.Image: QR code image that can be displayed or saved
15 """
16 qr = qrcode.QRCode(
17 version=1,
18 error_correction=qrcode.constants.ERROR_CORRECT_L,
19 box_size=10,
20 border=4,
21 )
22 qr.add_data(verification_uri_complete)
23 qr.make(fit=True)
24
25 img = qr.make_image(fill_color="black", back_color="white")
26
27 # Resize the image if needed
28 img = img.resize((size, size))
29 return img
30
31# Example usage in authorization flow
32def display_qr_for_pairing(pairing_codes):
33 """
34 Generate and display QR code along with manual pairing instructions.
35 """
36 if hasattr(pairing_codes, 'verification_uri_complete'):
37 # Generate QR code from the verification URI
38 qr_img = generate_qr_code(pairing_codes.verification_uri_complete)
39
40 # Display the QR code on screen
41 # For GUI applications like Tkinter, PyQt, etc.
42 # display_image(qr_img)
43
44 # For headless devices or testing, save to file
45 qr_img.save("frame_io_pairing_qr.png")
46
47 print(f"Scan the QR code or visit: {pairing_codes.verification_uri}")
48 print(f"Manual code: {pairing_codes.user_code}")
49 else:
50 # Fallback for devices that received traditional pairing response
51 print(f"Enter code on Frame.io: {pairing_codes.user_code}")

JavaScript 示例(Web 或 Electron)

1import QRCode from 'qrcode';
2
3/**
4 * Generate and display a QR code from the verification URI
5 * @param {string} verificationUriComplete - The complete verification URI from Frame.io
6 * @param {string} elementId - ID of the HTML element to display the QR code in
7 */
8function displayQRCode(verificationUriComplete, elementId = 'qrcode-container') {
9 const element = document.getElementById(elementId);
10
11 if (!element) {
12 console.error(`Element with ID ${elementId} not found`);
13 return;
14 }
15
16 // Clear any existing content
17 element.innerHTML = '';
18
19 // Generate QR code
20 QRCode.toCanvas(element, verificationUriComplete, { width: 250 }, function(error) {
21 if (error) {
22 console.error('Error generating QR code:', error);
23 // Fallback to displaying the URL as a link
24 element.innerHTML = `<a href="${verificationUriComplete}" target="_blank">Click here to pair</a>`;
25 }
26 });
27
28 // Also display manual pairing information
29 const manualInfoDiv = document.createElement('div');
30 manualInfoDiv.innerHTML = `
31 <p>Scan the QR code or <a href="${verificationUriComplete}" target="_blank">click here</a> to pair your device.</p>
32 <p>Manual code: ${userCode}</p>
33 `;
34 element.parentNode.appendChild(manualInfoDiv);
35}
36
37// Example usage in authorization flow
38async function requestDeviceCode() {
39 try {
40 const response = await fetch('https://api.frame.io/v2/auth/device/code', {
41 method: 'POST',
42 headers: {
43 'x-client-version': '2.0.0',
44 'x-client-platypus-enabled': 'true'
45 },
46 body: new URLSearchParams({
47 'client_id': YOUR_CLIENT_ID,
48 'client_secret': YOUR_CLIENT_SECRET,
49 'scope': 'asset_create offline'
50 })
51 });
52
53 const data = await response.json();
54
55 if (data.verification_uri_complete) {
56 displayQRCode(data.verification_uri_complete);
57 window.userCode = data.user_code; // Store for display purposes
58 } else {
59 // Fallback for traditional pairing
60 displayManualPairingCode(data.user_code);
61 }
62
63 // Begin polling for authorization
64 beginPollingForAuthorization(data.device_code, data.interval);
65
66 } catch (error) {
67 console.error('Error requesting device code:', error);
68 }
69}

Android 示例 (Java)

1import android.graphics.Bitmap;
2import android.widget.ImageView;
3import com.google.zxing.BarcodeFormat;
4import com.google.zxing.MultiFormatWriter;
5import com.google.zxing.common.BitMatrix;
6import com.journeyapps.barcodescanner.BarcodeEncoder;
7
8public void generateAndDisplayQRCode(String verificationUriComplete, ImageView qrCodeImageView) {
9 try {
10 MultiFormatWriter multiFormatWriter = new MultiFormatWriter();
11 BitMatrix bitMatrix = multiFormatWriter.encode(verificationUriComplete,
12 BarcodeFormat.QR_CODE, 250, 250);
13 BarcodeEncoder barcodeEncoder = new BarcodeEncoder();
14 Bitmap bitmap = barcodeEncoder.createBitmap(bitMatrix);
15
16 // Display in ImageView
17 qrCodeImageView.setImageBitmap(bitmap);
18
19 } catch (Exception e) {
20 e.printStackTrace();
21 // Fallback to displaying the URL as text
22 }
23}

iOS 示例 (Swift)

1import UIKit
2import CoreImage
3
4func generateQRCode(from string: String) -> UIImage? {
5 let data = string.data(using: String.Encoding.utf8)
6
7 if let filter = CIFilter(name: "CIQRCodeGenerator") {
8 filter.setValue(data, forKey: "inputMessage")
9 filter.setValue("H", forKey: "inputCorrectionLevel")
10
11 if let outputImage = filter.outputImage {
12 // Scale the image
13 let transform = CGAffineTransform(scaleX: 10, y: 10)
14 let scaledImage = outputImage.transformed(by: transform)
15
16 // Convert to UIImage
17 let context = CIContext()
18 if let cgImage = context.createCGImage(scaledImage, from: scaledImage.extent) {
19 return UIImage(cgImage: cgImage)
20 }
21 }
22 }
23
24 return nil
25}
26
27// Usage in your view controller
28func displayPairingQRCode(verificationUriComplete: String) {
29 if let qrCodeImage = generateQRCode(from: verificationUriComplete) {
30 qrCodeImageView.image = qrCodeImage
31
32 // Also show manual pairing information
33 pairingInstructionsLabel.text = "Scan the QR code or enter code manually"
34 pairingCodeLabel.text = userCode
35 } else {
36 // Fallback to manual code display
37 pairingInstructionsLabel.text = "Enter this code on Frame.io:"
38 pairingCodeLabel.text = userCode
39 }
40}

QR 代码显示的最佳做法

在实施 QR 代码配对时,请考虑以下准则以获得最佳用户体验:

  1. 最佳尺寸:QR 代码的显示尺寸至少为 200-250 像素见方,以确保可靠扫描。

  2. 对比度:确保 QR 代码与背景之间有高对比度(白底黑字是最理想的情况)。

  3. 纠错级别:使用中等纠错级别(L 或 M)来平衡代码密度和可靠性。

  4. 清晰说明:提供关于如何扫描代码的清晰指导,例如“使用您的智能手机摄像头扫描此码以配对设备。”

  5. 多种选项:始终在 QR 代码旁边提供手动配对代码作为备选方案:

Scan to pair:
[QR CODE]
Or enter code manually: 573131
  1. 移动应用程序的超链接:如果您的集成是一个移动应用程序,请将 verification_uri_complete 作为可点击的链接,因为用户无法从同一台设备扫描 QR 代码。

  2. 测试:使用不同设备并在各种光照条件下测试您的 QR 代码,以确保可靠扫描。

示例 QR 代码展示

故障排除

如果您遇到问题,请参考以下常见场景和解决方案:

  • “连接设备”按钮不可见:在访问 C2C 管理面板时,这可能表示:

  • 权限不足:如果您看到权限相关的消息,请联系您的客户经理调整权限或分配适当的角色。 * 已有设备连接:连接一台设备后,主要的“添加新设备”按钮会替换为 C2C Connections 面板右上角的三点菜单。

  • 无效客户端错误invalid_client 响应表示设备信息不匹配,通常是由于 client_secret 不正确导致的。

  • 错误请求错误bad_request 响应表示请求数据格式有误。请检查字段名称,并确保包含了所有必填字段。

如果您的问题在此处未得到解决,请分享您的经历,以便我们改进此故障排除部分。

后续步骤

我们鼓励您联系我们的团队,并继续阅读授权管理指南。 我们期待您的反馈!